How to use Oracles VirtualBox on Windows 10 (Step by Step Guide)

What is VirtualBox?

That is the first question you should be asking your if you are wanting to use it.   VirtualBox is a way for anyone to play around with other operating systems like Windows 11,  and yet I didn’t like it enough to even think about playing around with it on a Virtual machine.  You can also install different Linux operating systems to get yourself used to the Linux OS.  Either way, the long term’s of using VirtualBox is vastly better than you can imagine.  You can try new Operating system and see how they will do with what you might be interested in.   This will be a how to on Windows 10 because that’s what I am using but I have already talked about doing it on Linux  and installing Windows 10 on it.  If you’re curious about doing it the other way around that would be a good start.

After Installing VirtualBox in Windows 10

What’s the first Step in installing an operating system.  You either need the USB version or If you have a DVD of the operating system you want to install that will also be good.   Each way is not to hard to do while using VirtualBox.   First part of this is to initialize the Virtual System.

You’ll want to click the NEW button and you’ll be lead to this screen.  Give it any name you would but most will say something like MacOS, Linux, Or Windows (xp, 7, 10, 11) because you would basically like to keep track of that when you start using the Virtual machine.

VirtualBox is pretty intuitive when it comes to which operating you will be installing so when you name it the right Operating system.  You should see the version and type change down below to reflect the type of operating system parameters you’ll need to use the Virtual machine.

Dedicating the memory

You’ll want to dedicate a certain amount of memory to be use with VirtualBox so you can have enough to run the virtual operating system and not be sluggish.   If you have 16 gb or more of memory than you can easily divide it by 2 if you are just going to do one virtual machine at a time.  The Minimum I would recommend to use with a Virtual Machine is 4 gb but that is just a personal opinion.

Create a Virtual Hard drive

This is simply the easiest part of the creating the virtual machine.  You can have use as much as you like or as little as you like depending on your situation.  I usually give mine at least 10 gb or more depending on which operating I will be installing.  The more space you give the less you will have to use on your local hard drive so if you have another drive you want to use so as to not fill up your C: drive that would be preferable.

You’ll want to create a VHD or a VMDK but I rather like just useing the Virtual Hard Drive selection because it makes it so much easier for me.

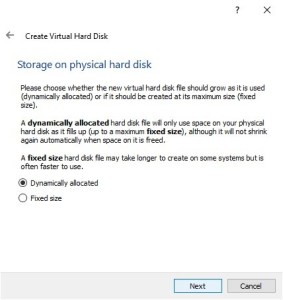
This is where you should say Fixed size, so it doesn’t use up so much space that it will create a problem for you later on.

If you’re unsure of how much to use just keep it where it is.  Most of time when you are just checking out a operating system you will not need to much space to test it out.  All you have to do now is Create the Virtual Hard drive and you’ll all setup for the next part.

Installing the Operating system

The next step is to tell tell VirtualBox which ISO you will be using to install into the virtual machine.  You’ll want make sure the new machine you just created is turned blue by click on it and then hitting the settings key on VirtualBox dashboard.

Finally you’ll want to hit the little disk drive at the top right and add a new ISO you are wanting to use for the virtual environment.

Simply hit the ADD button and navigate to where you downloaded that ISO and use that then click choose.  Once done then you are all set on this part of the setup.

Don’t forget about how the cores

This is not a big issue but sometimes might help with running the Virtual Machine by checking to see how many cores you might want to use with the new operating system.  This is however just something I’ve found to speed up the virtual machine.   If you have 2 cores you can obviously only use 1 but if you have more than 2 cores it can be nice to use a few more cores to make the system a little bit more responsive.

You are all set

This part is obviously the hard part is to just hit the start or double clicking on the virtual machine you want to make it execute.   Either way sit back and play around with what you can do with the new operating system and install it on to the virtual hard drive and you’ll be good to go.  Once you install, you can go back to the storage selecting in the settings and remove the ISO to prevent it from loading again.   In some cases it will so just go back and remove the ISO from the drive and you can just enjoy playing around with whatever system you want to explore.

How to wipe your hard drive securely before selling or recycling your computer

Photo by: pastedo on Pixabay

Wiping the Hard drive

Sometimes it’s a good idea to wipe the hard drive beyond recovery to prevent someone else from getting that information about the previous owner.     It is always a good idea to erase the information before you sell or recycle or even donate your computer.   You can destroy the data on the hard drive with little or no effort but it does takes an app to do it.   Depending on your situation, if you have an OEM system, than you will probably want to reinstall Windows into the system that you are going to wipe securely and erase the data on the hard drive.  It’s best before you do this to create a USB or DVD of the operating system you are going to wipe.   If this is Windows 10, you can download the the media creation tool for Windows 10 and make a bootable USB for Windows 10 for after the wiping of the hard drive.  If this is an older system like Windows 7, I would suggest before wiping checking to see if you have the DVD for it or you could buy a Windows 7 from amazon using my Affiliate Link, which I’ll get a small amount of money when you do that.  If this is another system all together, Like Linux, or even Mac OS you’ll have to get a copy of the operating system that you are going to wipe and reinstall it to be helpful to the next person to use the system.

DBAN : Darik’s Boot and Nuke

Darik's boot and nuke

This is one of the utilities that I use to remove and erase all the information securely to prevent anyone from getting the information that is on the hard drive.    It’s open sourced and can be downloaded freely.   They do have an enterprise version that is for those who are running a business and requires a license to do use in a business environment.  This is however the first one that I use when I have a Hard drive that I need to erase, destroy,  or wipe the entire Hard drive.  This can even be used on SSD and NVME’s.

MHDD

This one is similar to DBAN but has some interesting features that work well with what I might need to do.  I often times will us MHDD after I use DBAN just to be safe and make sure nothing is left on the hard drive, or the Solid State drives to prevent anyone from getting any information from the hard drive.  This probably sounds like over kill but I figure it sometimes is needed to prevent the people from accessing the data.  It was developed by Dmitry Postrigan and I have used this program from time.  You’ll need to download the ISO and create a bootable USB or CD/DVD to use this program and I suggest something like Yumi Pen Drive creator to make a USB Bootable Disk for MHDD.

Formatting the HDD, SSD, or NVME

Format commends

This is the last option I would suggest because this option is only going to do it once and you’ll need to format the disk several times with different commands to provide enough assurances that the data is destroy or wiped.  This option is good for those disk drives that didn’t have any really important information on them and had either games or files that probably didn’t have anything on that would be too personal  for anyone to find.   I usually use this as a last resort when I know the system wasn’t used to keep personal data and maybe the HDD was being exclusively used for games on it.  The format command on a HDD or SSD could be useful because it’s already on the media creation tool and can be accessed by hitting Shift+F10.

Then all you will need to do it type:

format <drive>: /fs:NTFS /p:1 (For zeros)
or
format <drive>: /fs:NTFS /p:2 (For one's)

This will write zero’s  or one’s to every sector on the HDD or SDD and will securely erase the data.   I have found to go from zero’s to one’s or doing one’s than doing zeros.   Be warned thought doing this will take a very long time.  It could be hours between passes.

This option is good when you have a system that you can use to install and format HDD and still do other things on the system or if you can pull the HDD and SSD out and temporarily install it on the working system.  While it does it things you can do other things on the system.   Be warned this might take some of your system resources while you are formatting the HDD in question.  The System might be a bit slower to respond.   Also it will take a VERY long time to do multiple passes on a HDD.  So don’t be surprised if it takes several minutes to go from 0 to 1% or several hours to even get to 100% depending on the size of the drive you are formatting.

Do you have any good tools that work better?  Why not leave a comment and tell me what you use to securely wipe hard drives and SSD’s.  Why not share your experiences and hear how you do it.  If this has helped you with something, why not consider checking out my affiliate links below and say thank you for this great resource.

How to repair a computer after a power surge

Dell Dimension 3000 Fried

Computer repair after power surge

Is that even possible?  There seems to be some questions about that with a few friends of mine.  We’ve been talking about this and I thought I’d would bring you along for the ride.   If you didn’t have a Uninterruptable Power supply(UPS)(Amazon Affiliate Link), then maybe it is time to buy one. See my affiliate link of all the possible UPS that Amazon has.  The problem with some computers is that they have so many things that could happen that you might not really know what could of been hit.  I’m going to walk through some possible areas where to look for burns and or shorts in the system to possible know what you might need to do to get your system back up.  Be advised this is only a way to tell what might be the problem and it may be worse than you can know just by looking and seeing.

Power Supply

The first place I always look is at the Power supply.  Since that is where electricity is designed to go to.  If you push the start button and the power supply doesn’t even turn on, than you might have a blown power supply.  You can however check the motherboard and memory but I usually check the PSU when I suspect the power supply might of gotten hit by lighting or a surge in the system.   The PSU does have a fuse inside it that might of blown.   That is usually something you will not be able to get at.   However if you have another PSU you can use to plug into the system than you might be able to know if the PSU is the issue in the first place.  Do you need a new PSU, why not check out my Amazon Affiliate link and see if you can find another one  for your needs.

Depending on your system setup

If you suspect that it was from your LAN(Local area network) network that you got the power surge, than I would start looking inside the computer around the LAN connection.   Some people use WIFI and it will not cause any problems but if you use a LAN cord to connect to the internet that is the next place to look at to make sure it’s not burned or any black areas around the connection.  If that’s the case the Motherboard will most like need to be replaced but that is if nothing else works.   You’ll probably need to buy a CPU and motherboard and depending on your setup the GPU.   If the GPU was close to the LAN, than that might need to be replaced too.  With the high prices of GPU’s this could get really expensive really fast.  However if the system turns on and still refuses to post without errors, you could  always try to problem solve the motherboard issue before you switch it out.    Even my Gigabyte b450m ds3h(Amazon Affiliate Link) motherboard wouldn’t be to hard to replace if I had to but I would have to buy another i9 LGA 1200 CPU which would cost a lot.

Motherboard powers on

If the motherboard powers on and you’ve done the problem solving for the motherboard.  The last thing I usually try is to remove everything possible besides the CPU and one stick of RAM to verify that there isn’t anything that might not be working.   If you do that and it boots then it’s either the RAM(Random Access Memory) or the GPU (Graphics Processing UNIT) if it has one in the first place.  If however you get the CMOS or CPU FAIL error than the motherboard or the CPU is bad and at that point the only good option is to replace the motherboard and everything else associated with it.   You can however try to use the CPU and memory on a new motherboard if you want to know if they are good but I usually just replace it completely because you never know when those other parts will fail and than you will still have repair and upgrade the system at the same time.   You probably won’t be able to find the same CPU again unless you buy it second hand.

Well these are the area’s I usually look at when I suspect either a power surge or a lightning strike has just happened and my system won’t boot or even start due it.   If it happened to you, I feel sorry for you but you should either invest in a UPS or a extension cord that has a circuit breaker to prevent you system from being fried.

Did it happen to you?  How did you handle it or was it worse than you thought?  I’d love to hear how you solved your issues and what it was like to have those issues.  Why not leave a comment and talk about it.   Don’t forget to sign up for my newsletter and receive notifications when I post new content. 

Some advice for new computer technicians

Computer network technician training offered in Vancouver

We can’t do this alone!

This is the most important idea that you should understand. Most computer technicians think that they have to do it alone when it comes to problem solving an issue.  It is because  no one can ever know how to fix every possible problems that may arise.   Those are the times we should ask question and ask for help from other technicians.   This will help you even more than you might imagine because some other technician might know how to solve the issue or problem that you are having.    We might never really understand what someone else might know.   This also includes customers, because what one customer might not know another one might.

Research is everything

Sometimes even other technicians might not know what is causing the problem.  So use everything at your fingertips.   Don’t underestimate the power of word search in Google, Bing, and Yahoo.  It isn’t like one search engine is better than another.  Each search engine has some information that some others might not have.  Don’t just use one but should always use all of them.   Sometimes one search engine will not have the answers, so I will always go and check out two or more search engines for a possible fix for the issues.

You will have angry customers!

No one tells you this but no matter how nice or good you are, you’ll have those angry customers. You should be prepared to deal with them. I say this with some experience, no matter what you’ll do for a customer there will always be those who know nothing about computers and then get mad at you for some reason or another. You’ll need to learn to be patient with an angry customer. Learn to come up with ways to alleviate the stress or anger from the customer. My go to phrase when a customer is angry or stressed is “Here’s what I can do for you . . . “.   If you tell the customer that you can do something for the customer even if it is something small, it helps with making the customer feel like they are being heard.   Also learn to active listen to the customer and make sure you hear what they say by repeating back to them the problems they are having.   Also sometimes the customer is going to just need to vent and be angry.  Technicians should learn to just be there for the customers.

Computers will break!

This is the next thing you will learn being a technician, that no matter how careful you are going to be with a computer, You’ll break a system just by doing something you’ve done a billion times.   If it can be broken, it will be broken.  Murphy just likes to make people’s life harder, and we will always have those days.   I can say with certainty that no one will ever be perfect at solving problems or fixing the issues.   I’ve seen motherboards break or CMOS fail at the most unusual times.  So you should be prepared to always apologize to the customers or say your sorry and make it right, even if it’s not your fault.   Sometimes customers will want to feel like they are important to you and that helps keeps the customers coming back.

No technical jargon

No matter how much you know or think you know, keep the technical jargon to a minimum with customers.   Most of them aren’t even going to know what you are talking about if you don’t relate the problem to the customer.  I can remember several times when I heard someone tell a customers about a command or hardware and the customers eyes just glaze over because they just don’t understand.   Only tell the customer what they need to know, if it’s a customer error, teach the customer and try to prevent them from creating the problem again.

I’ve been in the computer world a long time and I am sure the old and new a like will agree that these are some valuable tips for those who might be interested in being a technician.  Nothing I’ve said here will stop angry customers but it might help.   What’s some things you’ve learned to help with customers not getting angry or make the customer happy?  I’d love to here what helped you with customers and I am sure others will too.

My Initial thoughts on Windows 11!

Windows 11 — Just is!

It’s like pulling teeth!

I finally installed Windows 11 Windows Preview build into my system. Later last week I was wondering what they had done with Windows 11 and requirements. So I thought it would be a great idea to try to install Windows 11 with my current system that I built last year. Thanks to building this system just last year and thinking ahead, I got everything I could to prepare for the future needs. I even made sure it had TPM 2.0 just in case, I thought I’d not need this. I guess I was completely and most definitely wrong. I will say after talking about how to update Windows 10 to GPT and Secure Boot, that part went rather smoothly. I did find that if you have a Linux partition and a Windows partition then the converter will not be able to work. I had to erase the Linux Mint Distro partition to be able to convert it to GPT. I however divided the size to possibly install Linux mint along side Windows 11. I am curious to see just how well that will happen. That’s my next step in the next few days.

I didn’t like the setup

After converting the partitions and joining the Windows insiders program, I was able after a few attempts and fixing the CMOS.  It seems strange that I had to keep going into CMOS to enable even more things than I initially thought.   I had to enable secure boot, UEFI, and PTT (For those on Gigabyte Motherboards).   It wasn’t easy to say the least, I’d update one and the other and find out I had to enable more in the bios so Microsoft would see I met the requirements to download and install Windows 11.

Privacy is a Real concern!

I know on my Windows 10 system, I didn’t have my account linked to Microsoft but when I installed Windows 11.  It automatically linked my account to Microsoft.  I’d think if I am upgrading to Windows 11and it sees that it was a local account it would not link it to the Microsoft account.  The Bad news was I had to delete that account and remove all the data so Microsoft wouldn’t be watching me.  I had to re-install all my apps and loose some of my personally files but it was worth it to keep the information safe.  I wish I could of had an easy way to go back to my local account without having to jump through so many hoops.

It’s Just isn’t that good!

So far, after only using this for so many hours.  I can’t see any major differences that I will like.  The Start button will be an issue because I just don’t like it in the middle.   Also finding what I might need in the Settings is a little bit more interesting and difficult for me because they looked like they buried some of that.  I have also noticed the Windows 11 hack to revert my Windows start menu doesn’t work.  I’m going to try the Windows 11 preview builds some more but I am not that impressed with them and I might just go Windows 10 when Windows 11 finally get’s released unless they allow the users to use windows there own way, like No TPM, Or Secure boot.  I hope Linux will hurry up and make it easier for people to install Linux along side Windows 11.  I am almost sure there is a way just haven’t had time to explore the possibility.

Boot Times

After install Windows 11 and using my NVME drive, I have found the boot times to be a bit longer.  That was to expected because of the encryptions that is being used to quote “Secure” windows from any virus tampering.   I can’t see this being an extreme issue but I don’t  like the fact that it takes several more seconds on my NVME to boot up Windows when it would just boot almost instantly with my NVME.   They better fix that problem also because I don’t care about their so call security if I am sitting there waiting for the system boot.   All in All the Windows 11 experience isn’t as much a good thing as a bad thing.   I already know Virus writers are creating viruses to get around the so called security and I have done some research on the topic.  I can’t wait to say to Microsoft “I told you so“.

What’s your thoughts on Windows 11?  Have you tried it?  Will you install it even with the TPM and Secure boot requirements?  I’d like to hear your thoughts on the issue.  Why not leave a comment and tell me what you think about Windows 11.