
What is VirtualBox?
That is the first question you should be asking your if you are wanting to use it. VirtualBox is a way for anyone to play around with other operating systems like Windows 11, and yet I didn’t like it enough to even think about playing around with it on a Virtual machine. You can also install different Linux operating systems to get yourself used to the Linux OS. Either way, the long term’s of using VirtualBox is vastly better than you can imagine. You can try new Operating system and see how they will do with what you might be interested in. This will be a how to on Windows 10 because that’s what I am using but I have already talked about doing it on Linux and installing Windows 10 on it. If you’re curious about doing it the other way around that would be a good start.
After Installing VirtualBox in Windows 10
What’s the first Step in installing an operating system. You either need the USB version or If you have a DVD of the operating system you want to install that will also be good. Each way is not to hard to do while using VirtualBox. First part of this is to initialize the Virtual System.

You’ll want to click the NEW button and you’ll be lead to this screen. Give it any name you would but most will say something like MacOS, Linux, Or Windows (xp, 7, 10, 11) because you would basically like to keep track of that when you start using the Virtual machine.
VirtualBox is pretty intuitive when it comes to which operating you will be installing so when you name it the right Operating system. You should see the version and type change down below to reflect the type of operating system parameters you’ll need to use the Virtual machine.
Dedicating the memory

You’ll want to dedicate a certain amount of memory to be use with VirtualBox so you can have enough to run the virtual operating system and not be sluggish. If you have 16 gb or more of memory than you can easily divide it by 2 if you are just going to do one virtual machine at a time. The Minimum I would recommend to use with a Virtual Machine is 4 gb but that is just a personal opinion.
Create a Virtual Hard drive

This is simply the easiest part of the creating the virtual machine. You can have use as much as you like or as little as you like depending on your situation. I usually give mine at least 10 gb or more depending on which operating I will be installing. The more space you give the less you will have to use on your local hard drive so if you have another drive you want to use so as to not fill up your C: drive that would be preferable.

You’ll want to create a VHD or a VMDK but I rather like just useing the Virtual Hard Drive selection because it makes it so much easier for me.
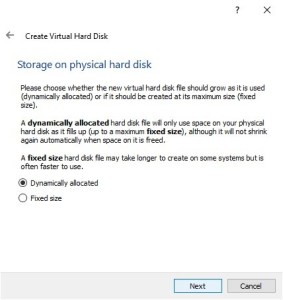
This is where you should say Fixed size, so it doesn’t use up so much space that it will create a problem for you later on.

If you’re unsure of how much to use just keep it where it is. Most of time when you are just checking out a operating system you will not need to much space to test it out. All you have to do now is Create the Virtual Hard drive and you’ll all setup for the next part.
Installing the Operating system

The next step is to tell tell VirtualBox which ISO you will be using to install into the virtual machine. You’ll want make sure the new machine you just created is turned blue by click on it and then hitting the settings key on VirtualBox dashboard.

Finally you’ll want to hit the little disk drive at the top right and add a new ISO you are wanting to use for the virtual environment.

Simply hit the ADD button and navigate to where you downloaded that ISO and use that then click choose. Once done then you are all set on this part of the setup.
Don’t forget about how the cores

This is not a big issue but sometimes might help with running the Virtual Machine by checking to see how many cores you might want to use with the new operating system. This is however just something I’ve found to speed up the virtual machine. If you have 2 cores you can obviously only use 1 but if you have more than 2 cores it can be nice to use a few more cores to make the system a little bit more responsive.
You are all set
This part is obviously the hard part is to just hit the start or double clicking on the virtual machine you want to make it execute. Either way sit back and play around with what you can do with the new operating system and install it on to the virtual hard drive and you’ll be good to go. Once you install, you can go back to the storage selecting in the settings and remove the ISO to prevent it from loading again. In some cases it will so just go back and remove the ISO from the drive and you can just enjoy playing around with whatever system you want to explore.